Connecting an External Meeting Scheduler to Your Agent
Last updated: September 29, 2026
If your team already books through Calendly, Chili Piper, RevenueHero, or another scheduler, you can point a Marketing Agent at it. The agent offers a button when a visitor is ready, and your scheduler handles everything after the click.
Docket can also book meetings itself, without sending the visitor anywhere. Which one you want is the first decision, so start there.
Should you use a CTA or Docket's own booking?
You want | Use | Who owns the booking |
|---|---|---|
To keep the scheduler your team already runs | An Agent CTA pointing at your booking URL | Your scheduler handles routing, availability, and invites. |
The visitor to book without leaving the conversation | Docket's Meeting booking card | Docket picks the rep from your CRM and rules, and books on their calendar. |
To keep Chili Piper routers but book in the conversation | Docket's Meeting booking, naming your Chili Piper router | Chili Piper decides the host, Docket runs the conversation. |
Docket's own booking connects to Google Calendar or Outlook Calendar, and is covered in Intelligent Routing for Docket Marketing Agent Meetings. The rest of this page covers the CTA route.
What do you need before you start?
Permission to edit the agent in Marketing Agent Configuration.
The visitor-facing booking URL, over HTTPS.
A decision on whether that page can open inside the widget or needs a new tab.
A clear idea of when the agent should offer the meeting.
How do you check the scheduler URL first?
Doing this before you touch Docket saves a round of debugging later.
Open the booking URL in a private browser window and confirm the right meeting type or routing form appears.
If you want it to open inside the widget, load the same URL in a basic iframe test page and confirm it renders.
Use the final visitor-facing link. If your scheduler needs its own JavaScript snippet, put that snippet on a page you own and use that page's URL, because a CTA opens a URL rather than running a script.
How do you add the booking CTA in Docket?
Open Marketing Agent Configuration and select your agent.
Open the Agent tab, turn on the Agent CTAs switch, then open the section.
Select Add CTA.
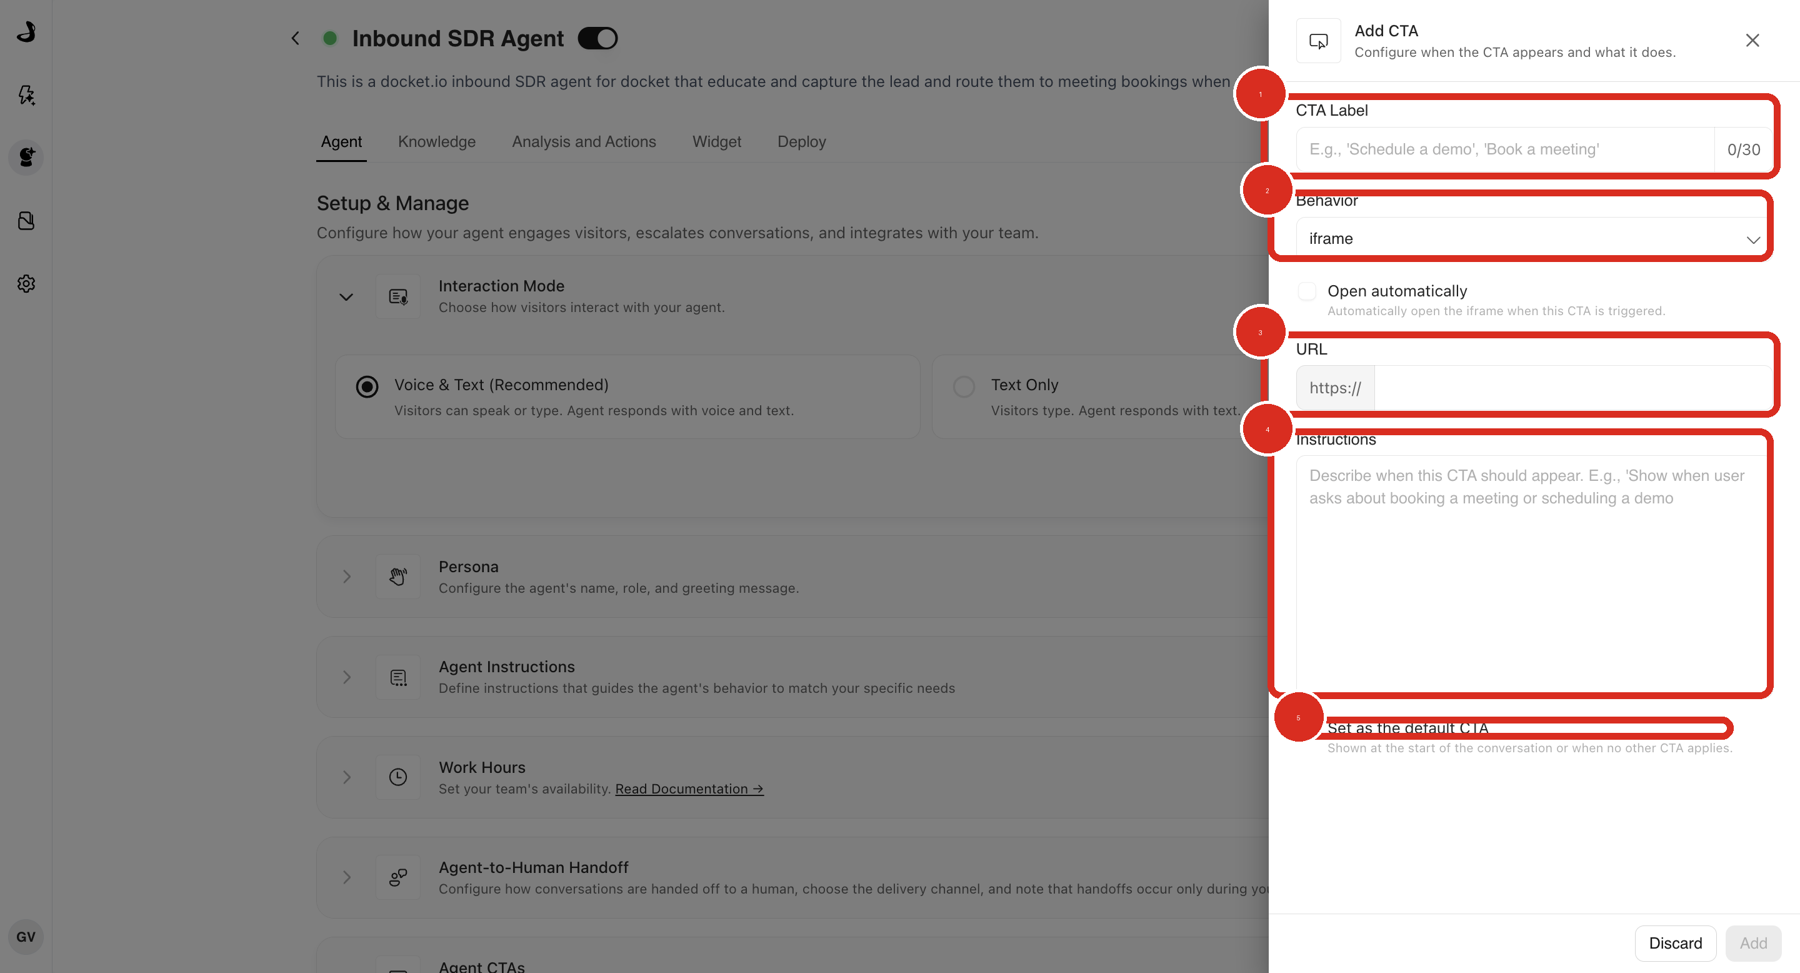
Enter a CTA Label such as Book a demo, within the 30 character limit.
Set Behavior to iframe only if the scheduler embeds cleanly, otherwise choose the new tab option.
Paste the booking URL into URL.
In Instructions, describe the moment the agent should offer the meeting.
Tick Set as the default CTA only if booking should be the button shown when nothing more specific applies.
Select Add, then save the agent configuration.
An agent can hold up to 20 CTAs, so there is room for several booking links if you route by region or team. Keep each one's instructions distinct.
What should the CTA instructions say?
Name the signal, not the topic. "Interested in the product" describes almost every visitor, so a CTA written that way appears far too early.
Better: Show this CTA after the visitor has described their use case and asks to see the product or speak to someone.
Avoid: Show this CTA to interested visitors.
How do you confirm the booking flow works?
Select Preview and run a conversation that matches your instructions.
Confirm the button appears at the point you expected, in the widget footer.
Open it and confirm the correct booking page loads.
Run a conversation that should not trigger it, and confirm it stays hidden.
If you chose iframe, repeat the test on the deployed page, on desktop and mobile.
Why isn't the booking CTA working?
What you see | What to check |
|---|---|
The button never appears | Confirm Agent CTAs is on, and that your test conversation matches the instructions. |
The booking page is blank in the widget | The scheduler blocks embedding. Switch the CTA to open in a new tab. |
The wrong meeting type opens | Recheck the exact URL saved in the CTA. |
A routing form does not load | Confirm the router or form works outside Docket first, on its own page. |
The visitor is asked for their email twice | Expected with a URL CTA. The CTA opens the page as entered and does not pass details the agent already collected. |
A different button appears instead | Only one CTA shows at a time. Another CTA's instructions matched first. |
Frequently asked questions
Can I use more than one scheduler on the same agent?
Yes. Add a CTA per booking link, and write instructions that separate them clearly, such as by region or team.
Does the CTA pass the visitor's email to the scheduler?
No. The CTA opens the URL as you entered it, so the visitor may be asked for details they already gave the agent. Docket's own meeting booking avoids that by booking in the conversation.
Which schedulers work with a CTA?
Any scheduler with a visitor-facing HTTPS booking page. For RevenueHero and Calendly specifics, see Connecting RevenueHero or Calendly to Your Agent. For Chili Piper routing inside the conversation, see Use Chili Piper Routing for Marketing Agent Meetings.
Can Docket book on Outlook rather than Google Calendar?
Yes, if you use Docket's own meeting booking. Each rep connects their own Google Calendar or Outlook Calendar. One agent books on one calendar system.
Does the meeting show up in our CRM?
Meetings booked through Docket's own booking are written to the CRM. A meeting booked through an external scheduler is recorded by that scheduler, following whatever CRM setup you already have there.