Setting Up Agent CTAs
Last updated: September 29, 2026
Agent CTAs are the buttons your Marketing Agent can offer during a conversation: book a demo, see pricing, open a guide, talk to sales. You write the button, the destination, and the moment it should appear, and the agent decides when that moment has arrived.
This is how a good conversation turns into a next step instead of ending politely.
What do you need before you start?
Permission to edit the agent in Marketing Agent Configuration.
The destination URL for each button, over HTTPS.
A clear idea of what a visitor should have said before each button appears.
How do you add a CTA to a Marketing Agent?
Open Marketing Agent Configuration and select your agent.
Open the Agent tab.
Turn on the Agent CTAs switch, then select the chevron to open the section. The section stays closed while the switch is off.
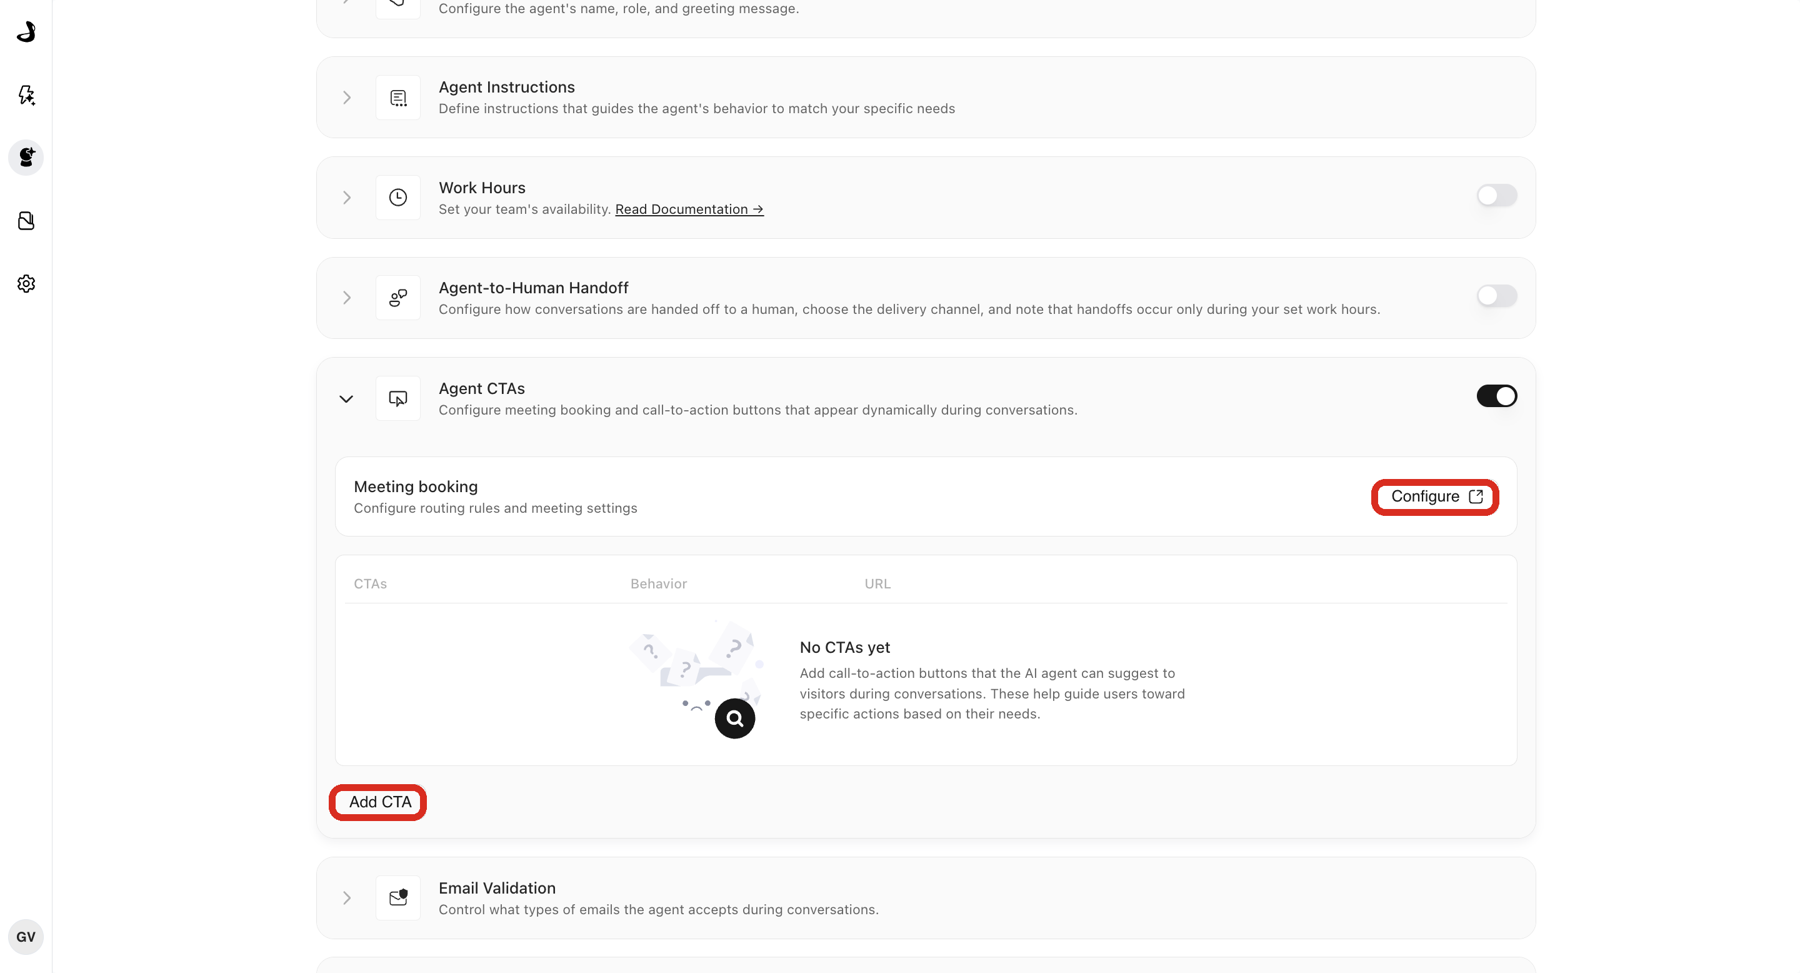
Select Add CTA.
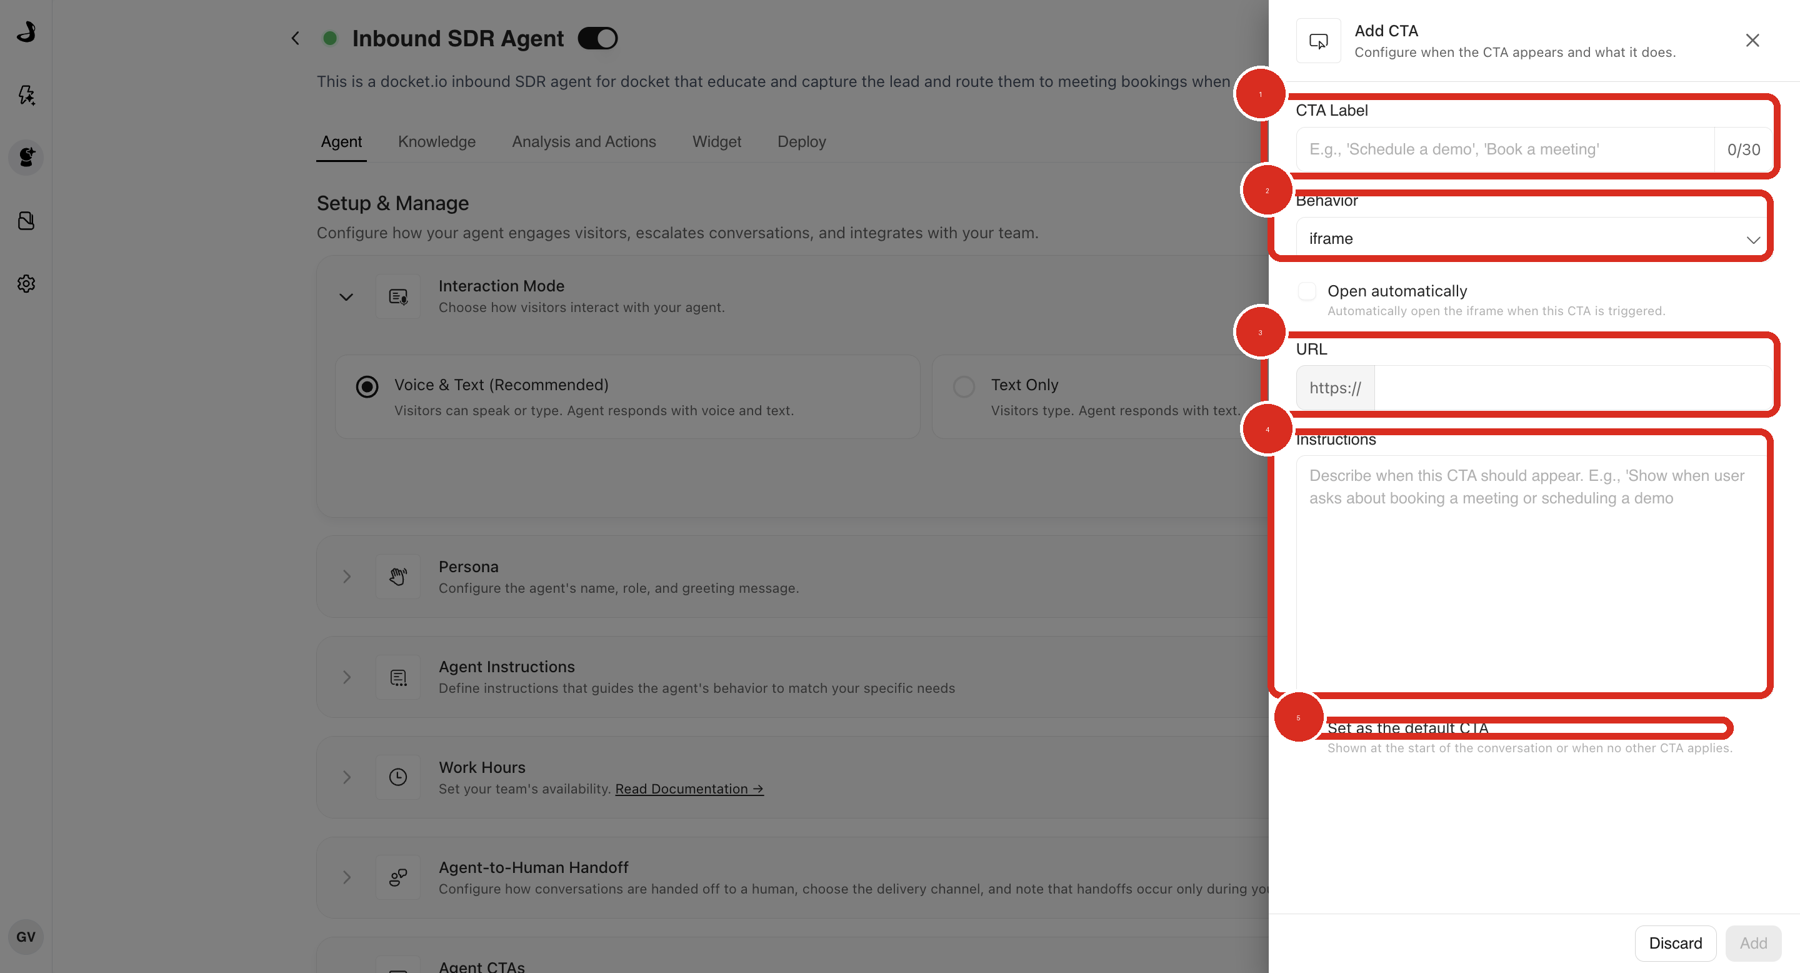
Enter a CTA Label. This is the button text visitors see, and it has a 30 character limit, so keep it to an action like Book a demo or See pricing.
Choose the Behavior, which decides whether the destination opens inside the widget or in a new browser tab. See CTA Behavior Reference.
Enter the URL.
In Instructions, describe the visitor signal that should bring this button up.
Tick Set as the default CTA if this should be the button shown at the start of a conversation and whenever no other CTA applies.
Select Add, then save the agent configuration.
How many CTAs can one agent have?
Up to 20. Docket shows how many you have left as you approach the limit.
That is plenty of room, and it is still worth using less of it than you can. Every CTA's instruction text is part of what the agent reads on each turn, so a long list of overlapping conditions makes the agent's choice less precise. Keep each CTA tied to one clear next step, and make the instructions distinct enough that only one of them fits any given moment.
What does the default CTA do?
The default CTA is shown at the start of the conversation, and again whenever no other CTA's instructions apply. Only one CTA can be the default.
Pick something broadly useful for it, such as booking a demo or talking to sales, and save the specific CTAs for narrower moments like pricing or implementation questions.
Why does only one button appear at a time?
Your CTAs share a single button slot in the widget. The default CTA sits there, and when a more specific CTA's instructions match, it replaces the default rather than appearing alongside it.
Two things follow from that, and both surprise people:
Do not write instructions that point a visitor at a button which is no longer on screen, such as telling them to use Book a demo just before a more specific CTA swaps in.
The button renders in the widget footer, below the conversation, not inline in the chat. When you test, look there.
How do you write CTA instructions that fire at the right time?
Describe the visitor's situation, not your goal. The agent compares your wording against what the visitor has actually said.
Instead of | Write |
|---|---|
Show when useful | Show when the visitor asks to book time with sales |
Show to interested visitors | Show after the visitor describes their use case and asks to see the product |
Show for support | Show when the visitor asks where to find setup or troubleshooting documentation |
If two CTAs could both match the same sentence, the agent has to guess. Make the conditions mutually exclusive.
Where do you set up meeting booking?
Meeting booking is its own card at the top of the Agent CTAs section. Select Configure to set when the agent offers a meeting, how it picks the right person, and which calendar it books on.
That is a different thing from a URL CTA. A URL CTA opens a page you own. Meeting booking creates the meeting inside the conversation. See Intelligent Routing for Docket Marketing Agent Meetings, or Connecting an External Meeting Scheduler to Your Agent if you would rather send visitors to a booking page you already run.
How do you confirm a CTA works?
Reload the Agent tab and reopen Agent CTAs to confirm each label, URL, behavior and instruction saved.
Select Preview and send a message that clearly matches one CTA's instructions.
Check the expected button appears in the widget footer and opens the right page.
Send a message that should not match anything, and confirm the default CTA is what appears.
Why isn't my CTA appearing?
What you see | What to check |
|---|---|
No button at all | Confirm the Agent CTAs switch is on, and look in the widget footer rather than the chat column. |
The wrong button appears | Two sets of instructions overlap. Make each condition describe a situation the other cannot match. |
The button you expected was replaced | Only one CTA shows at a time. A more specific CTA matched and swapped in. |
The default never shows | Confirm exactly one CTA has Set as the default CTA ticked. |
The page is blank inside the widget | The destination blocks embedding. Switch that CTA to open in a new tab. |
The CTA fires too early | Add a qualification signal, so the agent waits for intent rather than topic. |
Frequently asked questions
How long can a CTA label be?
30 characters. The field shows a counter as you type.
Can a CTA URL include details the agent already collected?
Not today. A CTA opens the URL exactly as you entered it, so if the destination asks for an email the visitor has already given the agent, they will be asked again.
Can I change a CTA after visitors have used it?
Yes. Edit it in the same section and save. The next conversation uses the updated version.
Do CTAs work on the standalone page as well as the widget?
Yes. CTAs belong to the agent, so they appear wherever that agent runs.
What happens if I delete a CTA that is set as the default?
The agent is left without a fallback button, so conversations that match nothing specific end without a next step. Set another CTA as the default in its place.