Configuring Docket's Multi-Agent Platform
Last updated: September 18, 2026
Most teams start needing more that one marketing agent once different parts of their website start needing different behaviour. A pricing page that should qualify and book meetings has a different job from a docs page that should answer quickly and get out of the way.
This guide will help you decide how many agents you might need, how to set each one up, and how to compare them once they are running.
When should you use more than one Marketing Agent?
Use separate agents when the agents need to behave differently, not just say different things. A single agent already handles several pages through its knowledge selection and its page-targeting rules.
Split into a second agent when the audience, the goal, or the next step changes. Keep one agent when only the content differs.
Avoid creating two agents with the same job. If the audience, the answers, and the next step are the same, refine one agent instead.
How do you plan an agent portfolio?
Give each agent one clear job, and write it down before you build anything.
Decide | Example |
|---|---|
Visitor journey | Homepage education, pricing qualification, or event follow-up |
Primary outcome | Answer a question, capture a lead, book a meeting, or hand off to a person |
Knowledge scope | Product overview, pricing content, or campaign-specific resources |
Placement | A specific page, campaign, or standalone experience |
Success measure | Interactions, leads acquired, meetings booked, or CTA engagement |
How do you create or open each agent?
Open Marketing Agent Configuration from the left sidebar.
Select Create Agent for a new journey, or select an existing card from Your Agents.
Give the agent a name that states its job, such as Pricing Guide or Website Concierge.
Confirm the agent name in the header before you change anything.
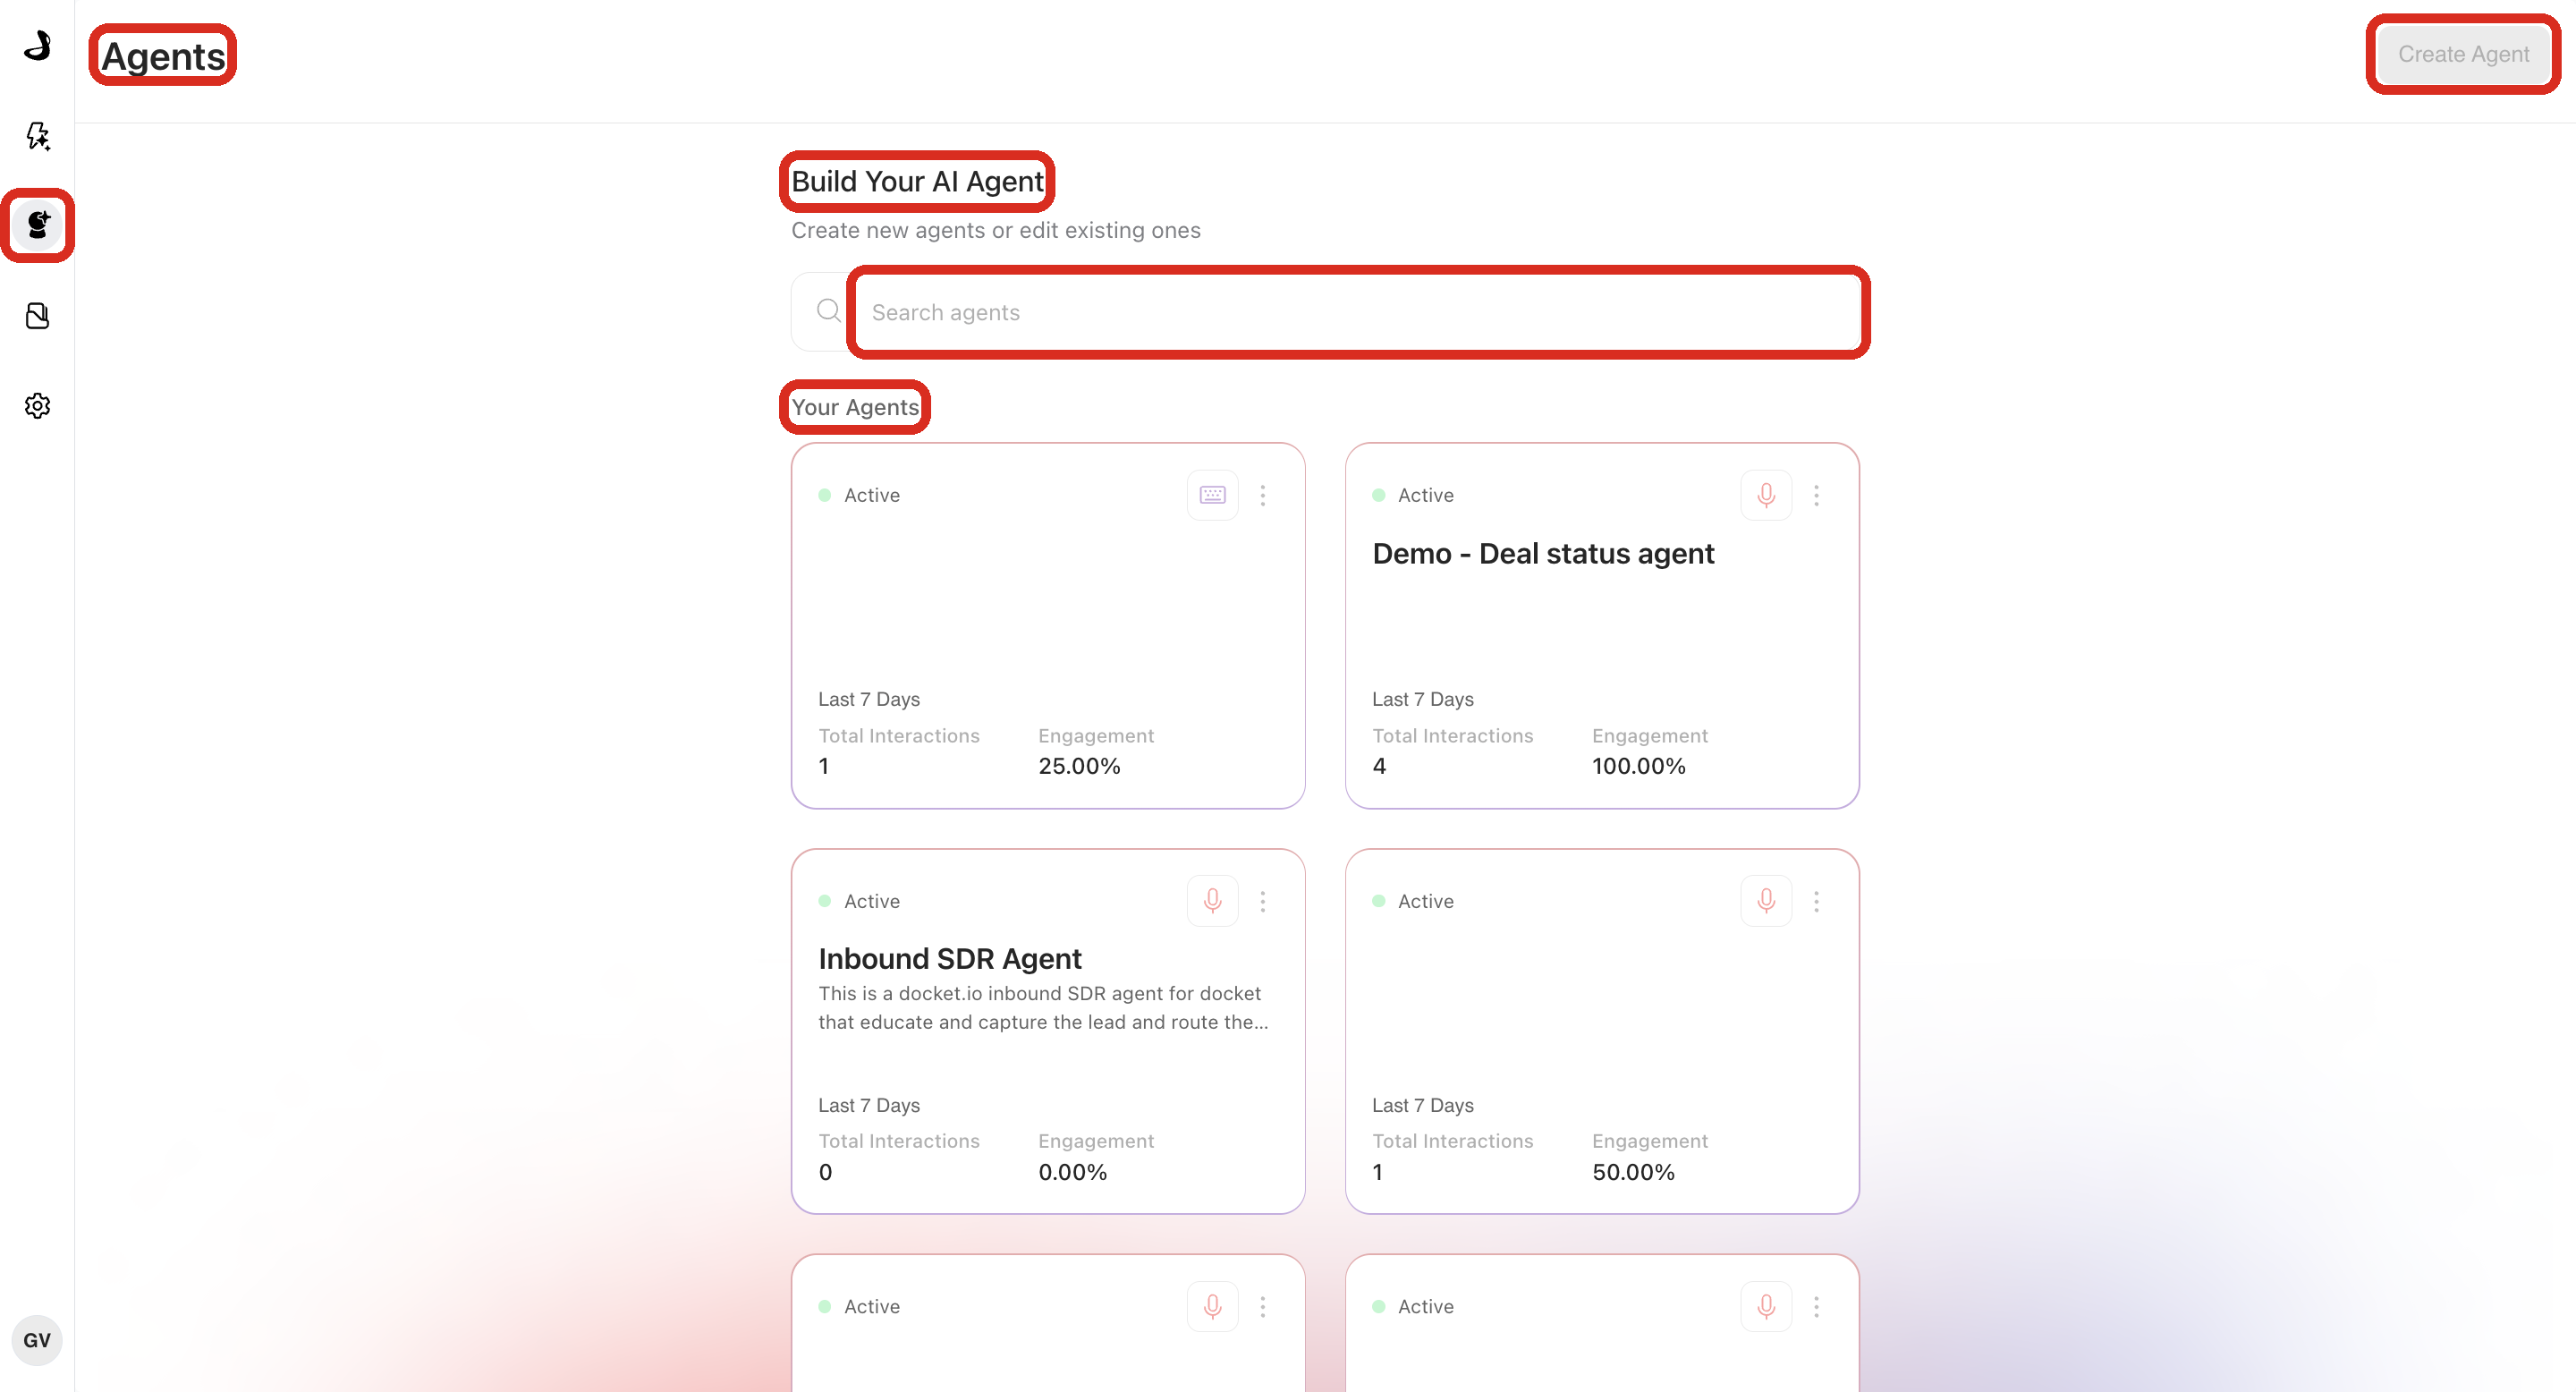
Use Search agents once the list is long enough to scroll. Naming agents after their job rather than their owner keeps that search useful as the team changes.
What do you configure on each agent?
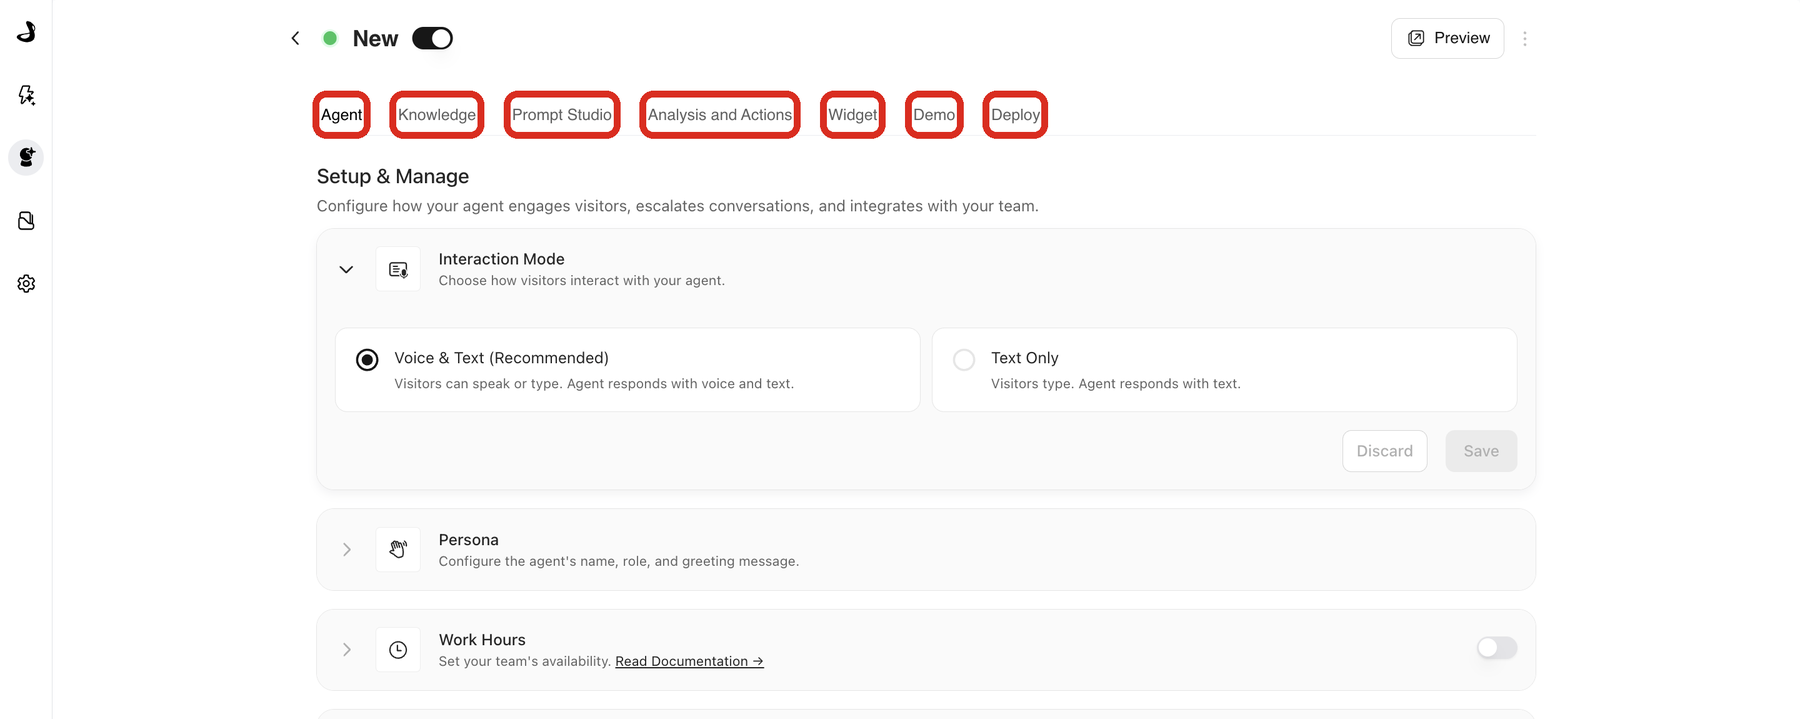
Tab | Configure |
|---|---|
Agent | Interaction mode, persona, greeting, work hours, handoff, and calls to action |
Knowledge | The files, web content, slides, and videos this agent may use |
Prompt Studio | How the agent behaves, described in your own words and published as a version |
Analysis and Actions | Post-call fields, actions, alerts, and CRM or marketing sync |
Widget | Appearance, behaviour, page targeting, and allowed domains |
Demo | Live, guided walkthroughs of your product inside the conversation |
Deploy | Website installation, standalone-page access, and IP access rules |
Every one of these settings is per agent, which is what makes a portfolio work. Agents created before Docket's current version show an Agent Instructions section on the Agent tab instead of a Prompt Studio tab.
Keep each agent's setup aligned to its job. A pricing agent should use approved pricing content and a pricing-specific call to action, not every source in the workspace.
How do you test each agent before launch?
Switch the agent on so that Preview appears in the header.
Select Preview and ask the questions that agent exists to answer.
Test the call to action, meeting booking, and handoff you configured for it.
Ask something it should decline, and confirm it follows your fallback instead of inventing an answer.
Review the Widget page rules and the Deploy access settings.
Launch one changed agent at a time where you can. It keeps results attributable and makes problems obvious.
How do you check the portfolio is set up correctly?
For every agent, confirm that:
Its name and purpose are clearly different from the others.
Its wording and selected knowledge match that purpose.
Preview completes the intended journey without pulling in unrelated content.
Its call to action, booking flow, or handoff appears under the right conditions.
Its Widget and Deploy settings match the page it is meant for.
The Marketing Agent Dashboard can isolate its activity with the agent selector.
Troubleshooting multiple agents in Docket
Issue | What to check |
|---|---|
Two agents give conflicting answers | Narrow their wording and their selected knowledge so each has a clear audience and answer scope. |
You edited the wrong agent | Return to Your Agents, confirm the name on the card, and reopen the intended agent. |
The wrong agent appears on a page | Review that agent's page-targeting rules, allowed domains, and which script is installed on the page. |
Two agents appear on the same page | Both scripts are installed there. Remove the one that should not be on that page. |
Preview behaves differently between agents | Compare their wording, knowledge, calls to action, handoff, and Work Hours. All of these are per agent. |
Dashboard results are hard to compare | Use the same date range and select one agent at a time. |
Frequently asked questions
How many Marketing Agents should we run?
One agent per job, not one per page. Start with the pages where the audience, the goal, or the next step is clearly different from the rest, then add an agent only when a new page needs genuinely different behaviour.
Can two agents share the same knowledge sources?
Yes. Sources live in Knowledge Sources at the workspace level, and each agent selects the subset it may use.
Do agents share conversation history or analytics?
Each agent keeps its own conversations and metrics. The Marketing Agent Dashboard rolls them up when you select All Agents.
Can I copy an agent instead of building each one from scratch?
Yes. Use Clone agent from the three-dot menu on an agent card. The clone arrives as a draft with its own script.
Does each agent need its own script on my website?
Yes. Every agent has its own ID and its own script, which is how Docket knows which agent to show on a page.
Can one agent behave differently on different pages?
Up to a point. Page-targeting rules change when and where the widget appears. When the answers and the next step need to change too, use a second agent.
What happens if I switch one agent off?
It moves to Disabled and stops answering visitors. Other agents are unaffected, and its configuration and history are kept.
Have questions?
For any further assistance or troubleshooting, please reach out to our customer support team at support@docketai.com.