Setting Up IP Access Rules for Agent Security
Last updated: September 29, 2026
Block traffic from a particular network, provider, or country so it cannot reach your Docket Marketing Agent, using IP Access Rules on the agent's Deploy tab.
Use this when the problem is where visitors are coming from. If instead you want to control which of your own domains may display the widget, use Whitelist Domains on the Widget tab.
Rules here only restrict access, so have the exact value you want blocked confirmed before you start.
What do I need before I add an IP Access Rule?
You need access to the agent in Docket and the exact network value you want to keep out, confirmed by whoever owns that network.
You can open the agent in Docket.
You have the IP address, IP range, ASN, or country code that should be blocked.
You have checked that the value does not cover your own office, VPN, or country.
You know who should still be able to reach the agent once the rule is in place.
How do I restrict who can access my Docket agent by IP?
Enter the network value you want blocked in the IP Access Rules section of the agent's Deploy tab, then select Add Rule.
Log in to Docket at app.docketai.com.
Click Marketing Agent Configuration in the left sidebar.
Select the agent you want to protect.
Open the Deploy tab.
Find IP Access Rules under the Deployment heading.
Click the arrow at the left of the IP Access Rules row to expand the section.
Type the IP address, range, ASN, or country code in the field under Restrict Access For.
Add a short note in Rule Label if you want one. This field is optional.
Select Add Rule.
Confirm the new rule appears in the list below the form.
Test the agent from a network the rule should block.
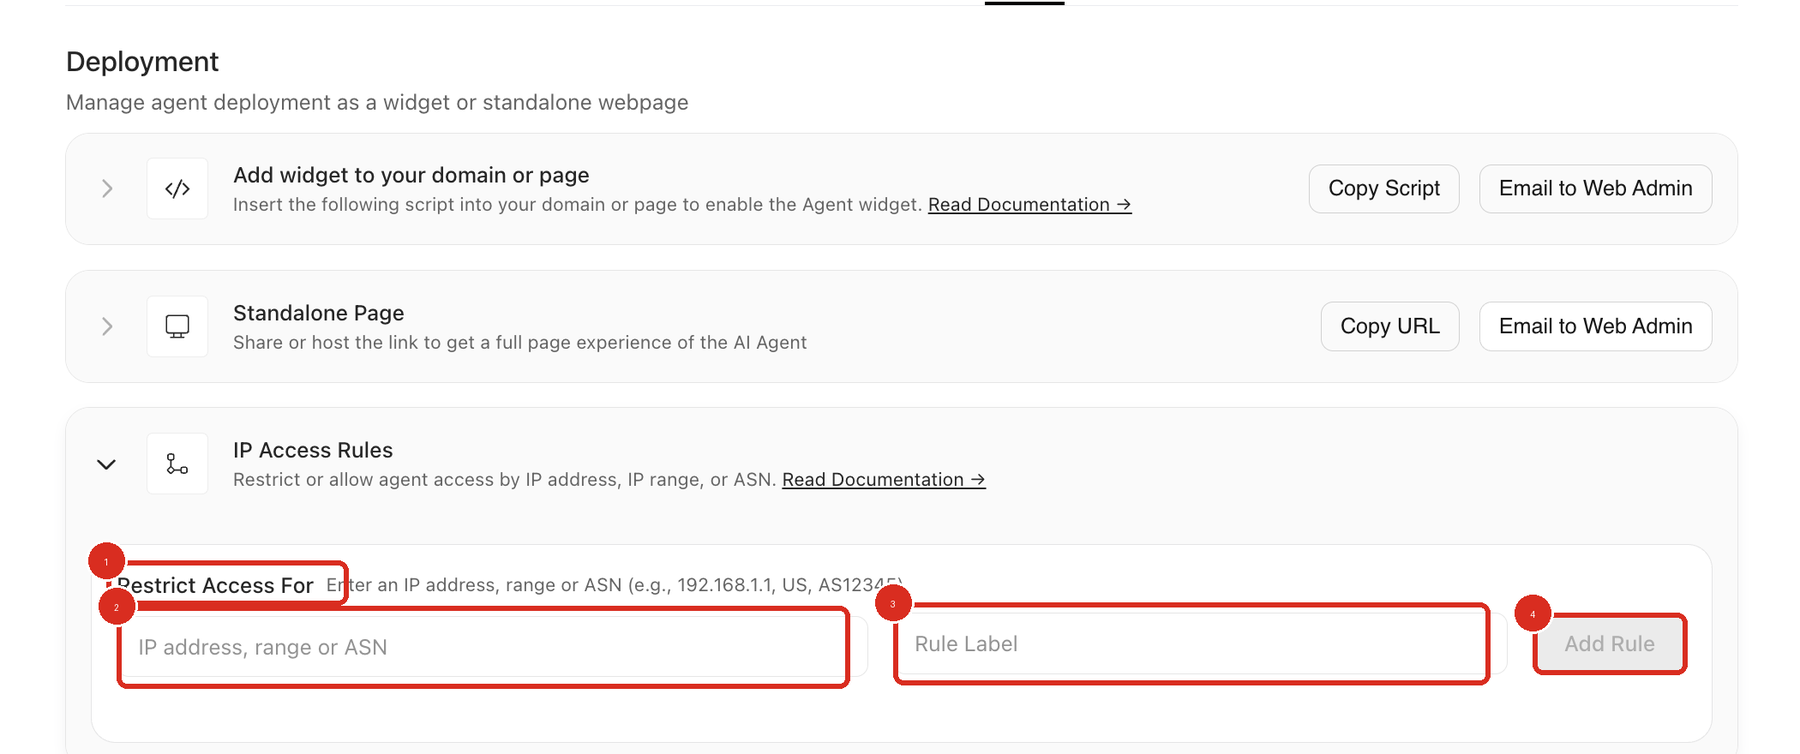
IP Access Rules is collapsed when you open the Deploy tab, so expand it before you look for the form.
Add Rule stays greyed out until you enter a value in the field under Restrict Access For. Filling in Rule Label on its own does not enable it.
What can I enter in the Restrict Access For field?
The field takes a single IP address, an IP range, an ASN, or a two-letter country code. The in-product hint reads "Enter an IP address, range or ASN (e.g., 192.168.1.1, US, AS12345)", and the US in that hint is a country code.
Value | Use It For | Example Format |
|---|---|---|
IP address | Blocking a single known IP address |
|
IP range | Blocking a whole network range |
|
ASN | Blocking a network provider or autonomous system |
|
Country code | Blocking traffic from one country |
|
Use the format your network or security owner provides. If you are not sure which value to use, confirm it before you create the rule.
Do IP Access Rules ever allow access instead of blocking it?
No. Every rule you add here restricts access, and whatever you enter is blocked.
The section subtitle reads "Restrict or allow agent access by IP address, IP range, or ASN", so the wording can suggest a choice. The form does not offer one. There is a single field labelled Restrict Access For, no rule-type chooser, and no allow option.
Read every value you type as a block. Entering your own office IP address, VPN range, or country code would block your own people from the agent.
To control which of your domains may display the widget, use Whitelist Domains on the Widget tab instead, described in Whitelisting Domains for Your Marketing Agent Widget.
What does a blocked visitor see?
A visitor matched by an IP Access Rule receives an HTTP 403 instead of the agent.
A domain that has not been whitelisted also returns 403, so a 403 on its own does not confirm which setting caused it. Check the agent's IP Access Rules and its Whitelist Domains list before you conclude either way.
When should I restrict a network?
Restrict a network when traffic from it should not reach the agent at all, and you can name that traffic by IP address, range, ASN, or country.
Use Case | Rule Strategy |
|---|---|
Security review | Restrict a network your security team has asked you to keep away from the agent. |
Noise reduction | Restrict a known source of low-quality or automated traffic. |
Unwanted provider traffic | Restrict a whole hosting or network provider by its ASN. |
Out-of-market regions | Restrict a country you do not sell into, using its two-letter country code. |
There is no rule for the opposite case. You cannot name the one network that should be let in and shut out everything else.
How do I remove an IP Access Rule?
Use the delete control beside the rule in the list below the form.
This is also your way back if a rule blocks people it should not. Find the rule in the list on the Deploy tab, delete it, then test the agent again from the affected network.
Best practices for IP Access Rules
Start with the smallest change. Add only the rule you actually need.
Check the value before you add it. Everything you enter is blocked, including your own office IP address or country code.
Use reviewed network values. IP ranges, ASNs, and country codes should come from your IT, security, or website owner.
Test after adding the rule. Confirm the visitors you still want can reach the agent.
Record why the rule exists. Use Rule Label for a short note, and keep the owner and reason somewhere your team can find them.
Review periodically. Network ownership can change, and a stale rule can block the wrong visitors.
Why isn't my IP Access Rule behaving as expected?
Start with the rules list on the Deploy tab and compare each value against the public IP address, range, ASN, or country the visitor is actually coming from.
Issue | What to Check |
|---|---|
Visitors you wanted to keep are getting a 403 | Review the rules list. A rule may cover their IP address, range, ASN, or country. Delete the rule if it does. |
The network you blocked can still reach the agent | Confirm the value format, and confirm the visitor really is coming from that IP address, range, ASN, or country. |
Add Rule will not respond | The button is disabled until the field under Restrict Access For has a value in it. |
Testing is inconsistent | Test from a clean browser session, and check whether a VPN, proxy, or office network is changing your source IP. |
Nobody can see the widget, and there are no IP rules | Look at the script and the domain instead. See Troubleshooting Widget Not Loading or Displaying. |
Frequently asked questions
Why is the Add Rule button greyed out?
Add Rule is disabled until you enter a value in the field under Restrict Access For. Rule Label is optional and does not enable the button on its own.
Can I block all traffic from one country?
Yes. Enter the two-letter country code, such as US, in the field under Restrict Access For. Visitors from that country are then restricted, so do not enter a country your own team works from.
What is the Rule Label for?
It is an optional note that records why a rule exists. It does not change what the rule blocks, and you can add a rule without it.
A visitor gets an HTTP 403 but I have not added any IP rules. Why?
A domain that is not whitelisted also returns 403. Check the Whitelist Domains section on the Widget tab, covered in Whitelisting Domains for Your Marketing Agent Widget.
How do I find the IP address, range, or ASN to enter?
Ask your IT, security, or website owner for the exact value. The form takes what you type as given, so a value that is close but wrong will block the wrong visitors or none at all.