Setting up SAML SSO with Okta for Docket
Last updated: September 22, 2026
Set up Okta as the identity provider for Docket, and optionally have Okta tell Docket when someone is deactivated.
This article covers the Docket side of an Okta SAML setup: the exact values to paste into your Okta application, the values to copy back into Docket, and the deactivation hook that keeps the two in step.
Single sign-on is not enabled on every plan. If the Single Sign-On tab is missing from your Settings, ask your Docket account team whether it is included in yours.
What do I need before connecting Okta?
Have these ready before you start:
The Admin role in Docket.
Administrator access in Okta, so you can create and assign an application.
A second Docket administrator session you keep signed in throughout.
One Okta user you can assign first, before anyone else.
Which Docket values go into the Okta application?
Docket shows both on the Single Sign-On tab in Settings, under Okta Configuration.
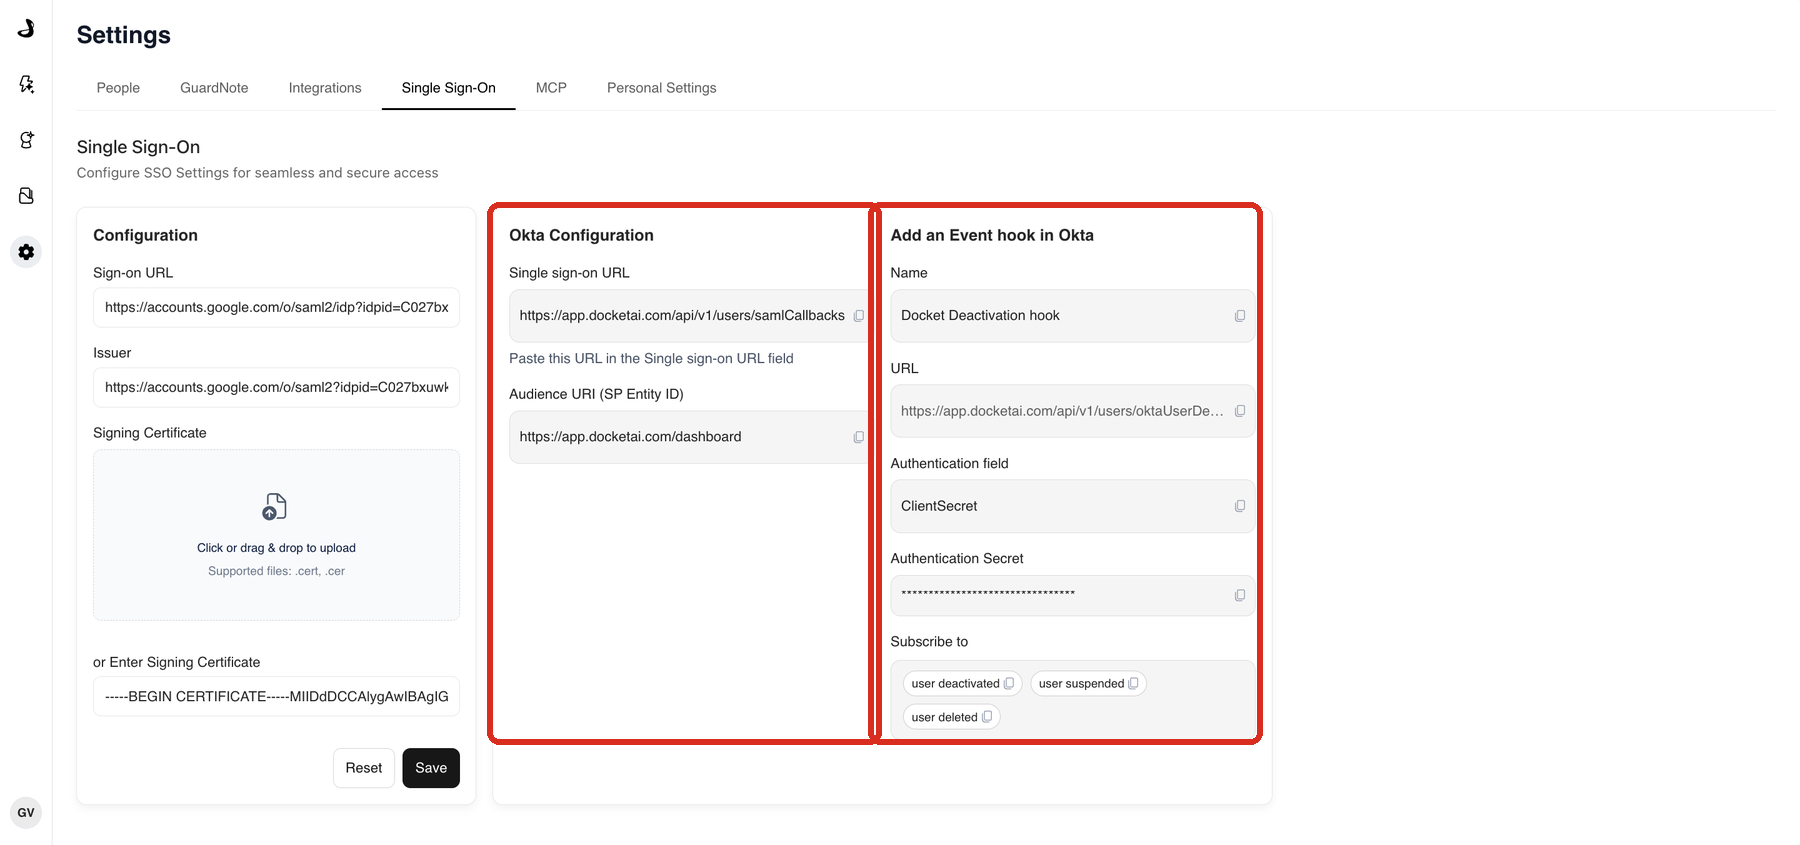
Okta field | Value to paste |
|---|---|
Single sign-on URL |
|
Audience URI (SP Entity ID) |
|
In Okta, create a SAML 2.0 application for Docket.
Paste Docket's single sign-on URL into Okta's Single sign-on URL field.
Paste Docket's Audience URI into Okta's Audience URI (SP Entity ID) field.
Assign one test user to the application, and nobody else yet.
Okta's own documentation covers the rest of its application setup, including attribute statements and the NameID format.
Which Okta values go into Docket?
Three, taken from the Okta application's sign-on settings.
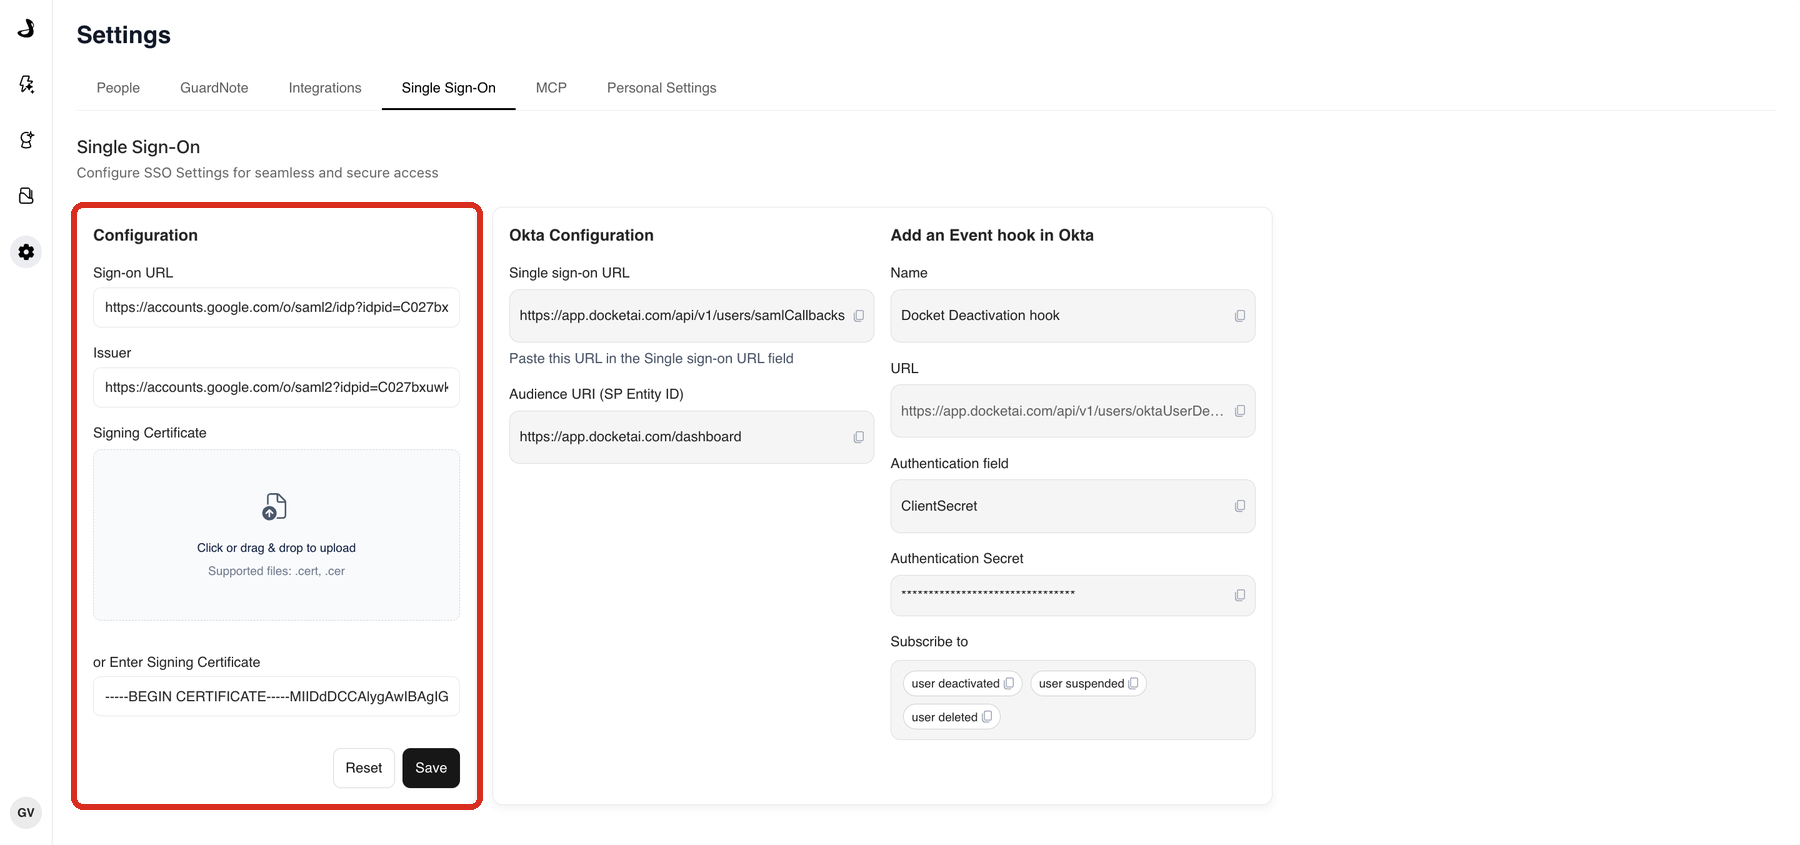
In Docket, open Settings and select the Single Sign-On tab.
Paste Okta's sign-on URL into Sign-on URL.
Paste Okta's issuer into Issuer.
Add the Okta signing certificate. Upload a
.certor.cerfile, or select or Enter Signing Certificate and paste the certificate text.Select Save.
Reset clears the form without changing your live configuration.
How do I test Okta sign-in before rolling it out?
Test with the one assigned user while your existing administrator session stays open.
Keep your current Docket administrator session signed in, in one browser.
Open a separate private browser window.
Go to Docket and select Sign in with SAML SSO.
Sign in as the assigned Okta test user.
Confirm they reach the workspace you expect, with the name and email you expect.
Assign the rest of your Okta users only after that works.
How do I make Okta deactivations reach Docket?
Add an Okta event hook. Docket then hears when someone is deactivated, suspended, or deleted in Okta, instead of you having to remove them by hand in both places.
The values are on the same Single Sign-On tab, under Add an Event hook in Okta.
Okta event hook field | Value |
|---|---|
Name |
|
URL |
|
Authentication field |
|
Authentication secret | Copy the value shown in your own Docket Settings. It is specific to your workspace. |
In Okta, create an event hook using the values above.
Subscribe it to the user deactivated, user suspended, and user deleted events.
Save the hook and verify it in Okta.
Deactivate your test user in Okta and confirm their Docket access stops.
Treat the authentication secret like any other credential. Copy it straight from your Docket Settings into Okta rather than passing it around.
Troubleshooting Okta single sign-on
What you are seeing | What to check |
|---|---|
Okta reports an audience or callback error | Recopy the single sign-on URL and Audience URI from Docket Settings, and remove any spaces introduced when pasting. |
Docket rejects the assertion | Confirm the Issuer and signing certificate in Docket match the Okta application, and that the certificate has not expired. |
The user is not authorized | Confirm they are assigned to the Docket application in Okta and are using the email address Docket knows them by. |
The certificate is rejected | Confirm the file is |
A deactivation in Okta did not reach Docket | Confirm the event hook is verified in Okta, subscribed to the three user events, and using the authentication secret from your own Docket Settings. |
A removed user can still sign in | Removing someone in Okta does not delete their Docket account. Remove them on the People tab as well. |
Frequently asked questions
Where do I find Docket's single sign-on URL and Audience URI?
On the Single Sign-On tab in Docket Settings, under Okta Configuration. They are the same for every Docket workspace.
Is the event hook required?
No. Single sign-on works without it. The hook is what makes an Okta deactivation reach Docket on its own, rather than you removing the person in both places.
Which Okta events should the hook subscribe to?
User deactivated, user suspended, and user deleted.
Can I change the Okta application after it is set up?
Yes. If you change the sign-on URL, issuer, or certificate in Okta, paste the new values into Docket's Single Sign-On tab and save.
What happens to people who signed in with a password before?
Their Docket accounts still exist. Removing someone's Okta access does not delete their Docket account, so remove them on the People tab too.