Connect Docket Demand MCP to ChatGPT, Claude, and Other MCP Clients
Last updated: September 23, 2026
Query your Docket data from ChatGPT, Claude, or any other MCP client, using a read-only connection that respects your own Docket permissions.
Docket Demand MCP lets an AI client ask questions about your Marketing Agents: how they are performing, who they captured, and what those conversations contained. The connection reads data and nothing else, so it cannot create, change, or delete anything in Docket.
It runs with the workspace and permissions of the Docket user who authorizes it, which means each teammate sees exactly what they would see when signed in to Docket.
What can Docket Demand MCP access?
Everything below comes from your own workspace:
Demand Capture Agents and their performance
Captured visitors and leads
Accounts that engaged with your agents
Conversation summaries, qualification status, pain points, and next steps
Transcripts and recordings, where your Docket permissions allow access
The MCP surface calls these Demand Capture Agents. They are the same Marketing Agents you create and configure in Docket.
What do I need before connecting?
Have these ready before you start:
Access to the Docket workspace you want to query.
An MCP client that supports remote HTTPS servers and OAuth.
Permission in that client to add a custom connector or MCP server.
Some clients require an administrator or workspace owner to enable custom connectors first. It is worth reviewing that client's data and connector policies before you give it workspace access.
Where do I find the Docket Demand MCP URL?
On the MCP tab in Docket Settings.
Open Docket and select Settings.
Select the MCP tab.
Under Docket Demand MCP, select Copy URL.
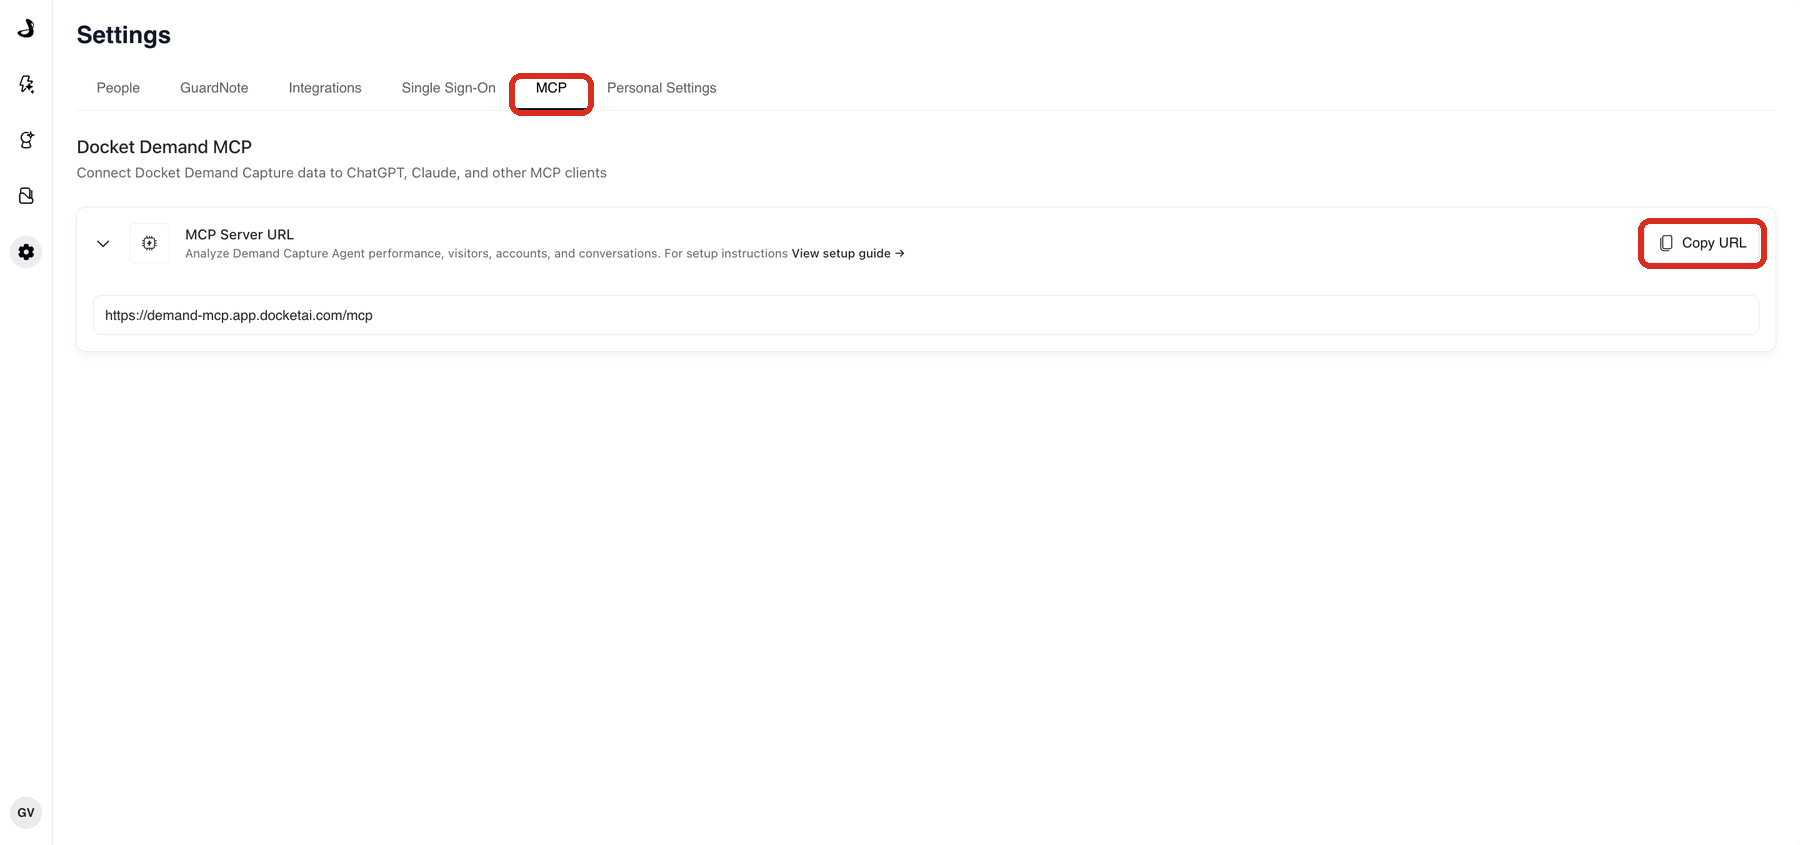
The production server URL is https://demand-mcp.app.docketai.com/mcp. Use Copy URL where you can, so you never paste an outdated endpoint.
How do I connect Docket Demand MCP to ChatGPT?
ChatGPT calls custom MCP connections apps.
Open ChatGPT in a web browser.
Go to Settings then Apps, and open Advanced Settings.
Enable Developer mode if your client requires it.
Select Create, and enter
Docket Demand MCPas the name.Paste the MCP Server URL you copied from Docket.
Select OAuth as the authentication method and accept the acknowledgement ChatGPT shows.
Select Scan Tools and complete the Docket authorization flow.
Wait for the tool scan to succeed, then select Create.
Your ChatGPT plan, workspace role, and administrator settings decide whether you can create a custom app. See the OpenAI developer mode documentation for current requirements.
To use the connection, start a chat and add Docket Demand MCP from the Apps menu.
How do I connect Docket Demand MCP to Claude?
Claude calls remote MCP connections custom connectors. The steps differ slightly depending on your plan.
On an individual Claude plan
Go to Customize then Connectors.
Select + then Add custom connector.
Enter
Docket Demand MCPas the connector name and paste the MCP Server URL.Select Add, then select Connect, and complete the Docket authorization flow.
On Claude Team or Enterprise
An organization owner adds the connector once, and then each person connects their own Docket account.
As an organization owner, go to Organization settings then Connectors and select Add.
Choose Custom then Web.
Enter
Docket Demand MCPas the connector name, paste the MCP Server URL, and select Add.Each user then goes to Customize then Connectors, finds Docket Demand MCP, selects Connect, and completes the Docket authorization flow.
See the Claude remote MCP connector guide for current plan and administrator requirements.
To use the connection, select + then Connectors and enable Docket Demand MCP.
How do I connect another MCP client?
Enter these values wherever the client asks for a custom MCP server, then complete the Docket authorization flow when prompted.
Setting | Value |
|---|---|
Name | Docket Demand MCP |
Server URL |
|
Connection type | Remote MCP or Streamable HTTP |
Authentication | OAuth |
The client has to support remote MCP servers and OAuth. Labels vary between clients, so check that client's documentation for its custom connector setup.
What can I ask once it is connected?
Ask in plain language, and narrow the request with a date range, an agent, a visitor, or an account where it helps.
"Compare our Demand Capture Agent performance for the last 30 days with the previous 30 days."
"How many qualified visitors were captured in the last 30 days? Group them by account."
"Summarize conversations from the past seven days and group the common pain points."
"Which conversations resulted in booked meetings this month?"
"Show the recent conversations and next steps for this visitor."
Troubleshooting Docket Demand MCP
I cannot add the connector
Check your client plan, workspace role, and administrator settings. Many clients restrict custom connectors, so ask your workspace administrator to enable them.
The client cannot connect or scan tools
Copy the MCP Server URL from Docket again.
Confirm the complete URL ends with
/mcp.Remove any stray spaces from the URL.
Confirm the client supports remote MCP servers and OAuth.
Retry the Docket authorization flow.
Authentication does not complete
Confirm you selected the correct Docket workspace.
Allow the authorization window to open.
Disconnect and reconnect Docket Demand MCP in the client's connector settings.
The connection returns no results
Confirm you authorized the workspace you meant to.
Add a date range or another filter to the request.
Confirm the Demand Capture Agent, visitor, or account you asked about exists in Docket.
Frequently asked questions
Can Docket Demand MCP change anything in Docket?
No. The connection is read-only. It cannot create, change, or delete agents, visitors, conversations, or configuration.
Whose data does the connection see?
The workspace and permissions of the Docket user who authorized it. Two teammates connecting the same MCP server can see different results if their Docket permissions differ.
Are Demand Capture Agents different from Marketing Agents?
No. They are the same agents you create and configure in Docket. Demand Capture Agent is the wording used on the MCP surface.
Can other people in my workspace use my connection?
No. Each person authorizes their own connection, even where an administrator added the connector for the organization.
Does the MCP connection give access to transcripts?
Only where your own Docket permissions already allow it. Transcripts and recordings follow the same access rules as the Docket interface.
How do I stop the connection?
Disconnect Docket Demand MCP in your client's connector settings. That removes the client's access without changing anything in Docket.
Related articles
For more help, contact Docket Support.