Connect Microsoft Dynamics 365 to Docket Marketing Agents
Last updated: September 29, 2026
Connect Dynamics 365 at the workspace level, then choose which CRM records each Marketing Agent can update after a conversation ends.
The Microsoft Dynamics 365 integration carries visitor and conversation context into your CRM. Docket can create a Lead when no active Lead or Contact matches the visitor's email, update matching records, and add Phone Call and Appointment activities.
In Docket, this integration appears as MS Dynamics CRM. This article uses Dynamics 365 when referring to the Microsoft product.
What does the Dynamics 365 integration write?
Docket matches the visitor by email address, then writes to the records related to that person.
Dynamics record | What Docket does |
|---|---|
Lead | Updates the first active Lead that matches the visitor's email. If no active Lead or Contact matches and Lead writeback is enabled, Docket can create a Lead. |
Contact | Updates the first active Contact that matches the visitor's email. |
Account | Updates the parent Account of a matched Contact. Docket does not search Accounts independently using the visitor's email. |
Opportunity | Updates up to 10 open Opportunities related to a matched Contact or the Contact's Account. |
Phone Call | Optionally creates a Phone Call activity after a conversation. |
Appointment | Optionally creates an Appointment when the visitor books a meeting through Docket. |
A visitor email is required for CRM matching. If both an active Lead and an active Contact use the same email, Docket can update both records when their write settings are enabled.
What do I need before connecting Dynamics 365?
Have these ready before you start:
Docket access. You need the Admin role to connect a workspace integration.
A cloud Dynamics 365 Sales environment. On-premises deployments are not supported.
A Microsoft work account that can approve the requested access and make changes in the target Dataverse environment.
Your Microsoft tenant ID for the Dynamics environment.
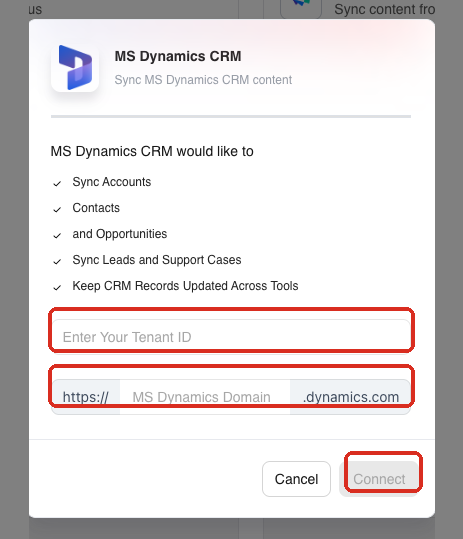
Your Dynamics domain. From the environment URL, take the part between
https://and.dynamics.com. Forhttps://contoso.crm4.dynamics.com, that iscontoso.crm4. You can find the URL in the environment details in the Power Platform admin center.
How do I connect Dynamics 365 to Docket?
Connect Dynamics 365 once for the whole workspace, from the Integrations tab in Settings.
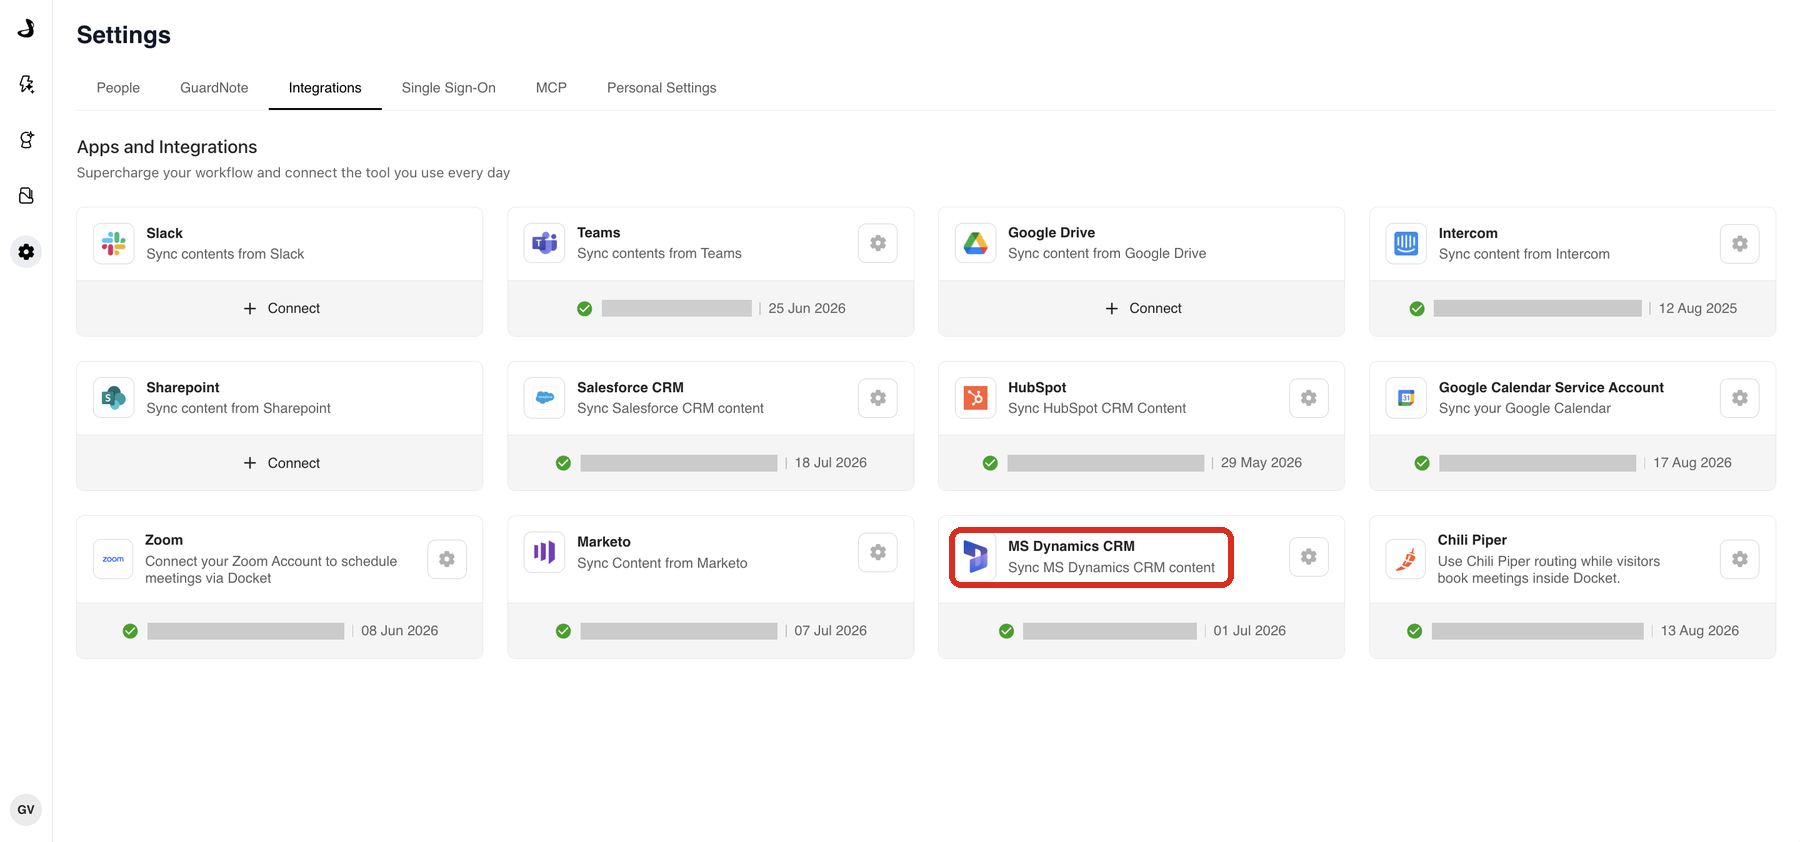
In Docket, open Settings and select the Integrations tab. The page is titled Apps and Integrations.
Find MS Dynamics CRM and select Connect.
Enter the Microsoft tenant ID and Dynamics domain when prompted.
Continue to Microsoft sign-in, review the permissions requested for your organization, and approve access with an authorized account. Your tenant's consent policy decides whether an administrator has to approve the request. See Microsoft's permissions and consent overview.
Return to Docket and wait for the integration card to show that it is connected.
The connected status confirms Microsoft authorization. Docket then completes the rest of the Dynamics setup in the background, so there is no managed solution file to import.
Why can I not see the Docket fields in Dynamics?
Because the custom fields Docket creates during setup are not added to a form or view automatically. A Dynamics administrator opens the relevant solution in Power Apps, adds the fields to the form or view, then saves and publishes the customization. Until then the fields exist in the underlying Dataverse schema but are invisible to CRM users.
How do I choose what Docket reads from Dynamics 365?
Read access brings Dynamics records into Docket so an agent can use them mid-conversation. It is set on the integration card and is separate from the per-agent writeback settings.
On the connected Dynamics card, select the settings icon, then select Settings.
Under Data Access, review the Read setting for Lead, Contact, Account, and Opportunity.
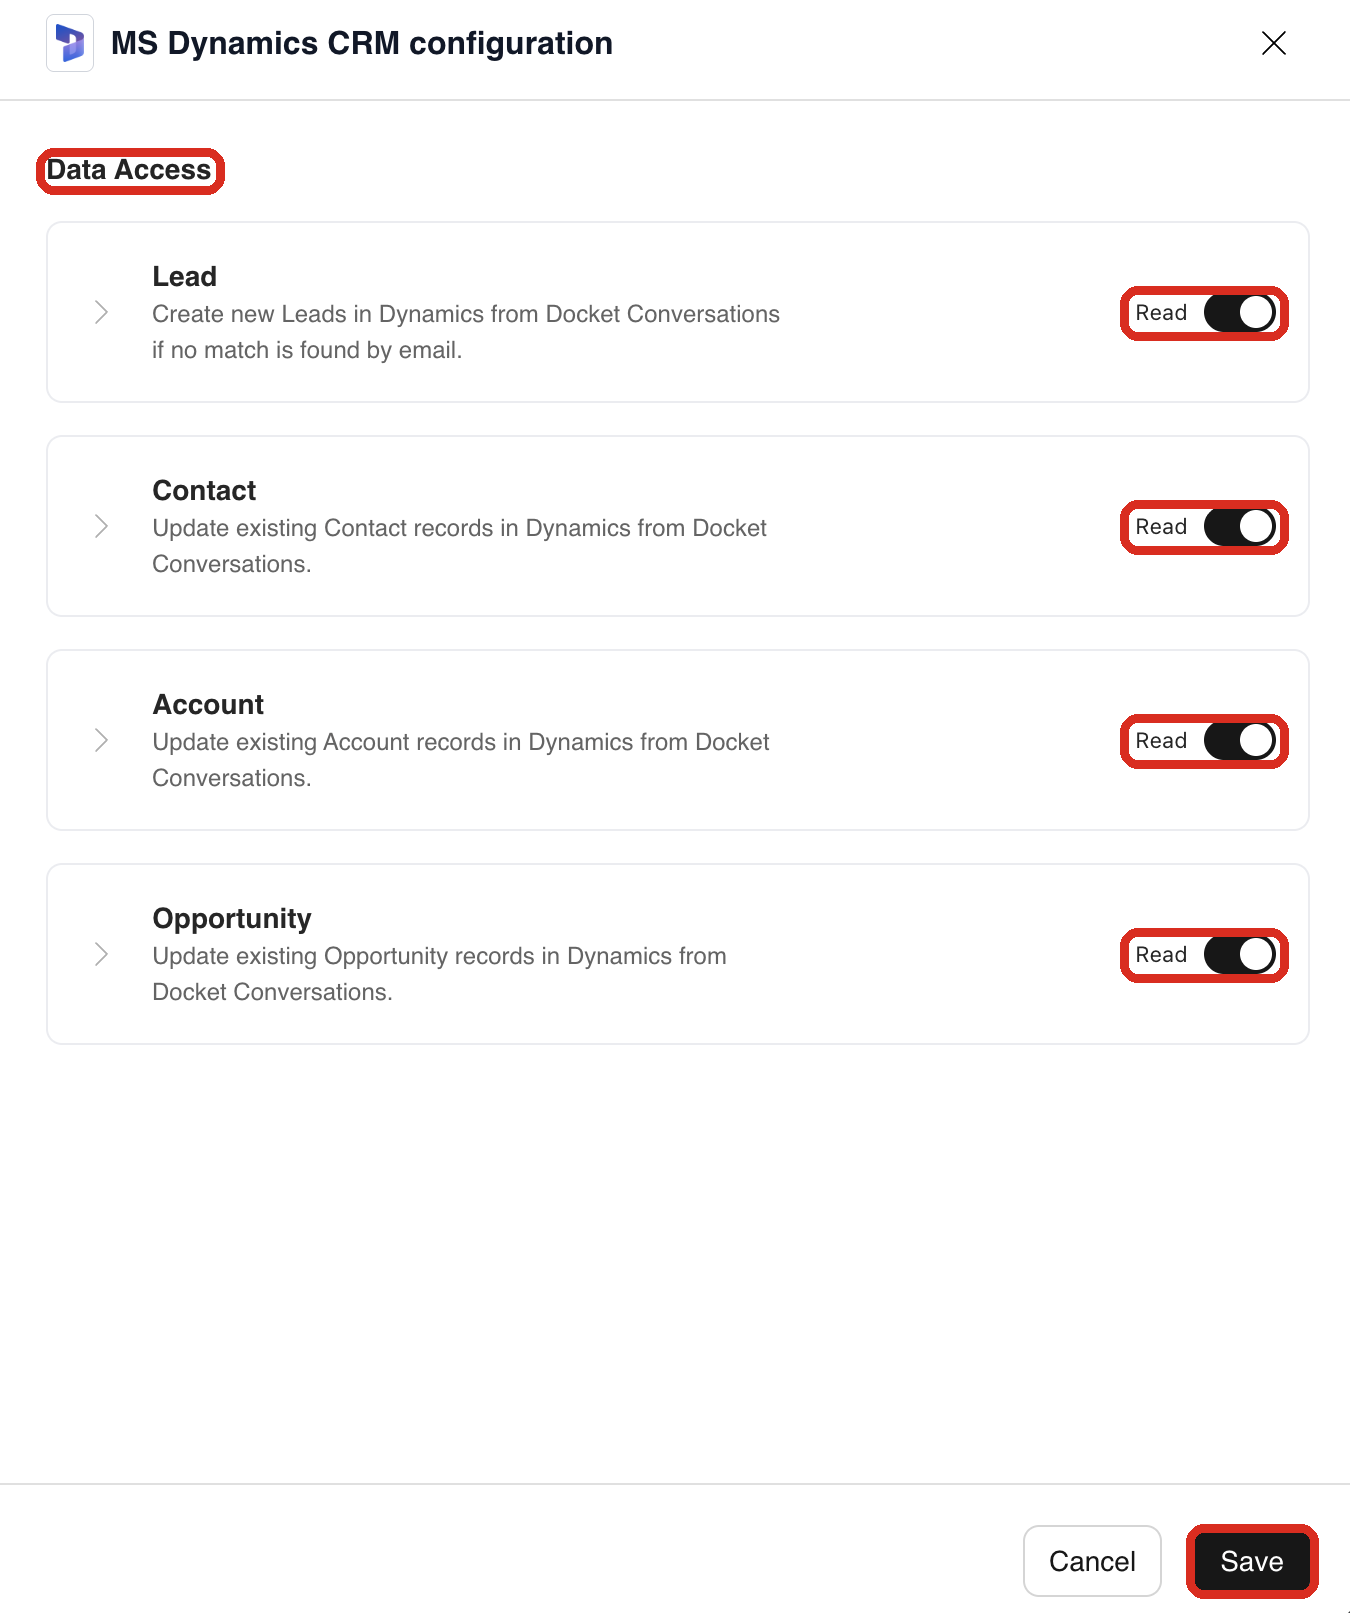
Select Save.
How do I turn on Dynamics 365 sync for a Marketing Agent?
The workspace connection makes Dynamics available. The agent-level switch decides whether that particular agent runs the Dynamics writeback.
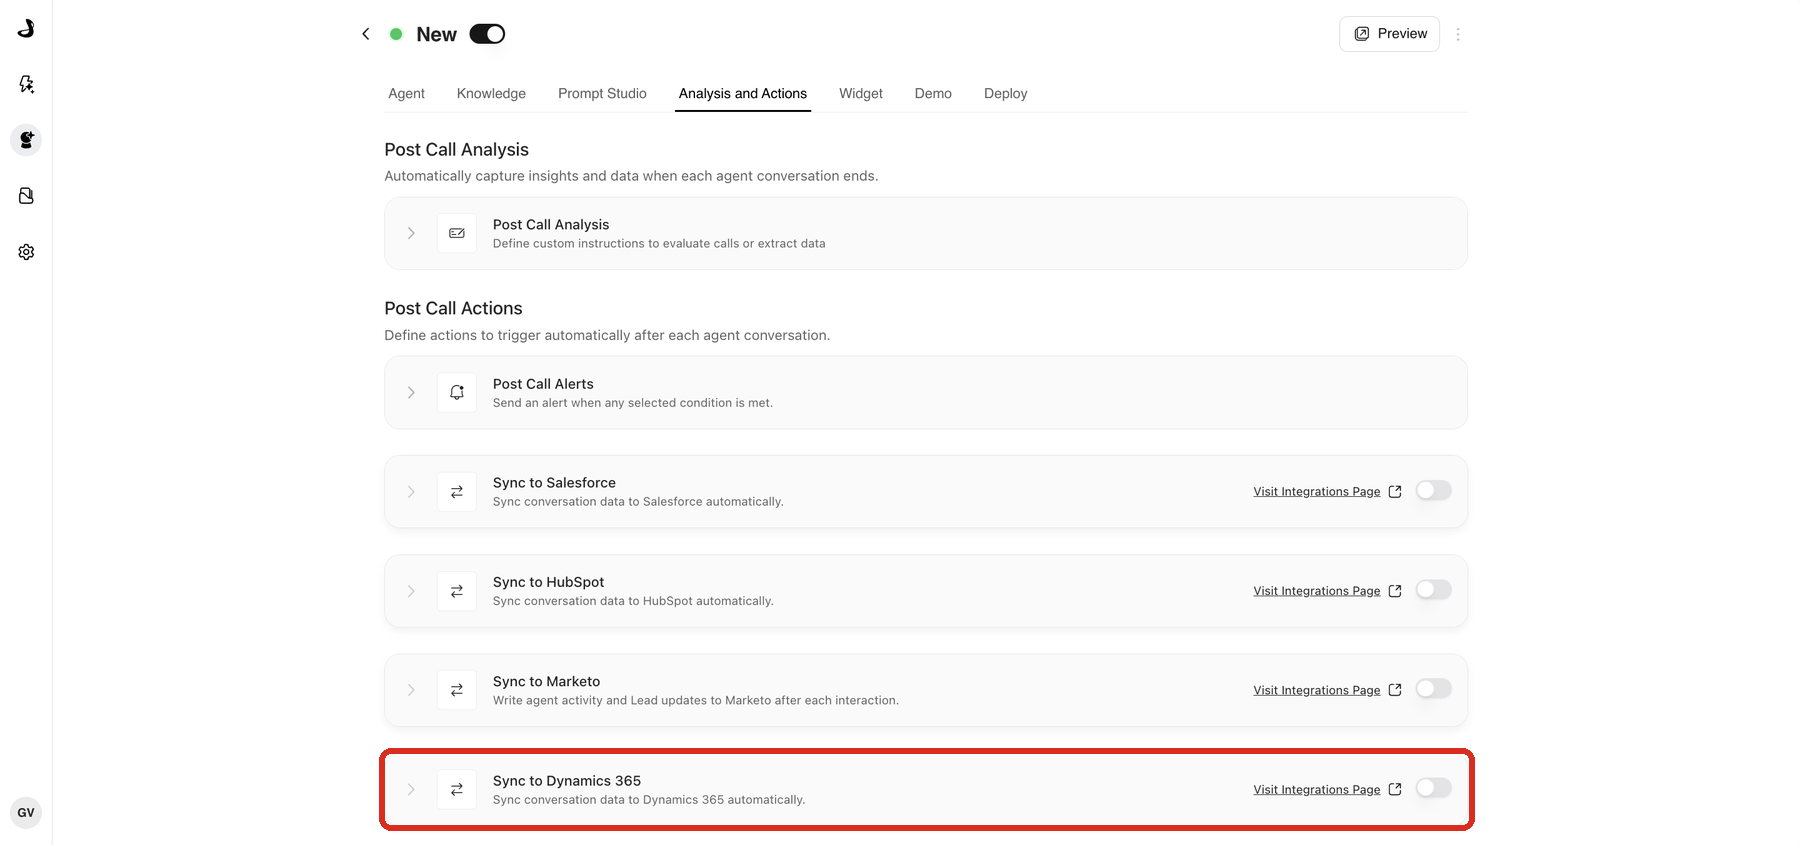
Open Marketing Agents and select the agent you want to configure.
Open Analysis and Actions.
Under Post Call Actions, turn on Sync to Dynamics 365.
How do I choose records and map fields?
Expand a record type to review its saved field mappings and choose how each Dynamics field is updated.
Enable Lead if the agent should update matching Leads, or create a Lead when no active Contact or Lead matches.
Enable any other record types this agent should update.
Expand a record type and select a Docket Field with the Dynamics Field it should write to.
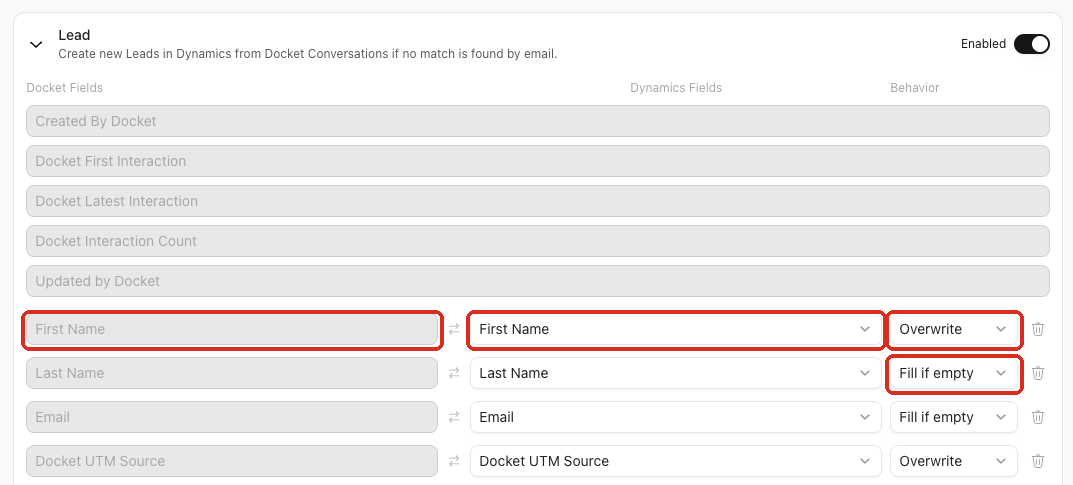
Choose the mapping Behavior. Fill if empty writes the Docket value only when the Dynamics field has no value, and Overwrite replaces the existing value.
Add or remove mappings as needed, then select Save.
Reopen the section and confirm the write controls and mapping behaviors persisted.
How do I log conversations and meetings as Dynamics activities?
Docket creates activities related to each Lead or Contact updated during the writeback. Expand Docket Activity to turn them on.
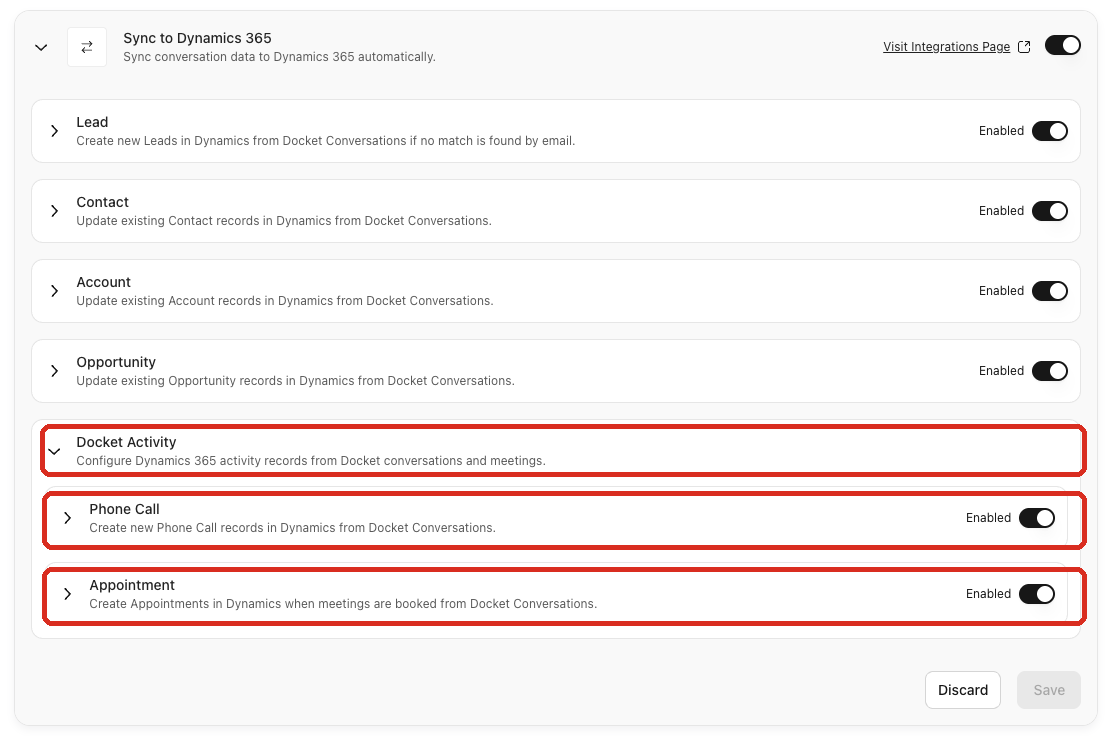
Phone Call creates a Phone Call activity after a conversation. Its description carries the conversation details and the transcript where available.
Appointment creates an Appointment when the conversation includes a Docket meeting booking. Docket adds the matching Dynamics user when the meeting owner's email belongs to an active Dynamics user.
Enable the activities you need, then select Save.
Troubleshooting Dynamics 365 sync
What you are seeing | What to check |
|---|---|
The connection does not complete | Confirm the tenant ID and Dynamics domain, and that the connecting Microsoft account can approve access and make Dataverse changes. |
Dynamics is connected, but the agent does not write | Confirm Sync to Dynamics 365 is on for that agent, the record type is enabled, the mapping is complete, and the configuration was saved. |
No Lead or Contact is updated | Confirm the conversation captured a visitor email and that the matching Dynamics record is active. Docket checks active Contact and Lead records independently. |
Account or Opportunity is not updated | Confirm a Contact matched first. Account and Opportunity writeback follows the matched Contact's relationships. |
A field is missing or a mapping is invalid | Refresh the agent configuration page, reopen Sync to Dynamics 365, then replace the invalid mapping and save again. |
No Appointment is created | Confirm the conversation produced a Docket meeting booking, that Appointment is enabled, and that Docket updated a Lead or Contact. |
The Docket fields are missing from a Dynamics form | A Dynamics administrator has to add them to the form or view in Power Apps and publish the customization. |
Frequently asked questions
Does Docket support on-premises Dynamics 365?
No. Docket connects to a cloud Dynamics 365 Sales environment. An on-premises deployment cannot be used.
Do I need to import a managed solution into Dynamics?
No. Docket completes the required Dynamics setup in the background once Microsoft authorization succeeds.
Why is the integration called MS Dynamics CRM in Docket?
That is the card name on the Apps and Integrations page. It refers to the same Microsoft Dynamics 365 product described in this article.
Can Docket create Contacts, Accounts, or Opportunities?
No. Docket can create a Lead. It updates Contacts, Accounts, and Opportunities only where a matching record already exists.
What happens if a Lead and a Contact share the same email address?
Docket can update both, as long as the write setting for each record type is enabled. It checks active Contact and Lead records independently.
How many Opportunities does Docket update?
Up to 10 open Opportunities related to the matched Contact or that Contact's Account.
Do I have to connect Dynamics again for each agent?
No. Connect Dynamics once in Settings, then turn on Sync to Dynamics 365 for each agent that should write back.
Related articles
If you need help with your Microsoft Dynamics 365 integration, contact Docket Support.